Rust & Iced: Let's draw some arrows!
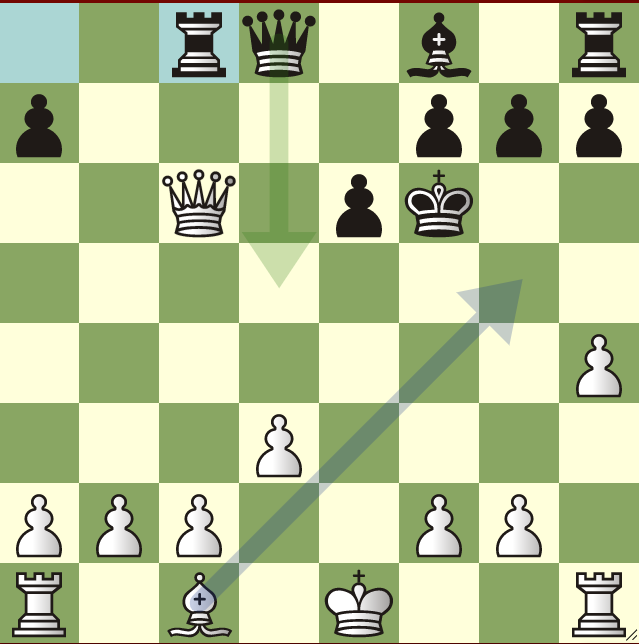
May 11, 2025I have been working on a chess desktop application using the iced GUI library. This is my first big project using rust, so it has been a fun endeavor learning iced as well as rust at the same time. The iced documentation is almost non-existent, so hopefully i can document some of my learnings here for future reference. The iced API is also evolving rapidly, so its possible this gets obsolete pretty quickly, but the general ideas here will still be valid. One of the features I am implementing is the ability to show the contents of a chess pgn file on a chessboard, which means building out a full fledged chessboard in iced. Visual annotations, like arrows, are incredibly useful for highlighting key moves and strategic ideas in chess analysis. In this post, I’ll guide you through the process of drawing these arrows using the Iced Rust GUI library’s canvas feature.

Let’s assume we need to draw an arrow between two points (iced::Point), start_point and end_point. In our chess application, start_point and end_point would typically be calculated based on the coordinates of the starting and ending squares of the move being annotated on the chessboard. The arrow consists of two parts, the arrow shaft, and the arrow head. The arrow head will be of length arrowhead_length, so the length of the shaft will be the distance between the points minus the arrowhead_length. Let’s also introduce a margin which is the distance from the arrow tip and the end_point, so as to give some flexibility while drawing the arrow. So overall, shaft_length + arrowhead_length + margin = distance between start_point and end_point.
Let’s first calculate some convinence variables to make our code easier to understand.
let (dx, dy) = (end_point.x - start_point.x, end_point.y - start_point.y);
let hypot = (dx * dx + dy * dy).sqrt();
let (udx, udy) = (dx / hypot, dy / hypot);
dx and dy are vectors in the direction pointed to by the arrow, and udx and udy are the corresponding unit vectors.
Now, the end of the shaft should be a distance of arrowhead_length + margin away from the end point of the arrow.
let shaft_end = Point::new(
    end_point.x - udx * (arrowhead_length + margin),
    end_point.y - udy * (arrowhead_length + margin),
);
Now that we have both the start and end points of the shaft, lets draw it on the canvas. Iam choosing a relative width for the line, so that is scales well with the size of the overall canvas.
let shaft = Path::line(start_point, shaft_end);
let shaft_stroke = iced::widget::canvas::Stroke {
    width: square_size * 0.20,
    style: iced::widget::canvas::Style::Solid(color),
    ..Default::default()
};
frame.stroke(&shaft, shaft_stroke);
Now, let’s draw the arrowhead. The arrowhead will be a filled triangle, with its tip at the end_point, and the other two points lying on a perpendicular line that is arrowhead_length away from the top of the arrow.
let arrow_tip = Point::new(end_point.x - udx * margin, end_point.y - udy * margin);
As discussed above, margin is used for some flexibility. If margin=0, then the tip will be at the end_point.
Now, we can use use some fun properties of slope of perpendicular lines to find the coordinates of the other two points. If you have a unit vector (udx, udy) pointing along the arrow shaft, then a unit vector perpendicular to it is (-udy, udx). The other unit vector perpendicular to it (pointing in the opposite direction) is (udy, -udx)
let a2 = Point::new(
    shaft_end.x - udy * arrowhead_length * 0.6,
    shaft_end.y + udx * arrowhead_length * 0.6,
);
let a3 = Point::new(
    shaft_end.x + udy * arrowhead_length * 0.6,
    shaft_end.y - udx * arrowhead_length * 0.6,
);
The 0.6 factor in these calculations controls the width or how spread out the base of the arrowhead will be. The value was mostly chosen for aesthetics. The only point to note here is that the two points will be on a line perpendicular to the shaft at the end of the shaft.
Now that we have all three points, we can just use the builder pattern to create the iced::Path and then draw the filled triangle.
let head_path = Path::new(|builder| {
    builder.move_to(arrow_tip);
    builder.line_to(a2);
    builder.line_to(a3);
    builder.close();
});

frame.fill(&head_path, color);
I hope this post has been helpful! As I continue building out my chess application with Iced and Rust, I look forward to sharing more of my learnings. Stay tuned!
#iced #rust #chess